Contrary to popular belief, creating a functional home studio in a tight space isn’t about cramming in gear or simply finding a spare corner. The key is to approach your apartment as an architect would: by designing an environment that acts as a psychological tool. This guide re-frames the challenge from one of limitation to one of strategic design, focusing on how sensory cues and workflow ergonomics can trigger creativity and focus, even in the most compact of living spaces.
For any artist, musician, or creator living in a small urban apartment, the dream of a dedicated studio can feel like a frustratingly distant luxury. The common advice often circles around compromises: use smaller gear, soundproof with cheap foam, or accept that your dining table must also be your workstation. This approach treats the creative space as an afterthought, a problem to be managed rather than a tool to be leveraged. We end up working in spaces that feel cluttered, uninspiring, and psychologically draining, which directly impacts the quality of our output.
But what if the entire premise is flawed? What if the solution isn’t about finding more square footage, but about mastering the space you have with intention? As an architect specializing in micro-living, I see space not as a container, but as an active participant in your life and work. The true challenge isn’t a lack of space; it’s a lack of psychological partitioning. The secret lies in understanding that your environment is a powerful instrument. By strategically manipulating light, sound, storage, and spatial boundaries, you can craft a zone that tells your brain it’s time to create.
This isn’t about buying expensive equipment; it’s about applying design principles to your existing environment. This article will guide you through this architectural mindset. We will deconstruct the elements of a creative environment—from acoustics to circadian lighting—and show you how to reassemble them into a cohesive system that supports, rather than hinders, your creative flow. Forget compromise; it’s time to design your sanctuary.
To navigate this architectural approach, we will explore the essential elements of designing a high-performance creative space. The following sections break down how to control your environment to foster focus and inspiration, turning constraints into creative assets.
Summary: The Blueprint for Your Creative Space
- Why Your Physical Environment Dictates Your Creative Output
- How to Soundproof a Room Cheaply for Recording Audio?
- Warm or Cool Light: Which Color Temperature Boosts Creativity?
- The Storage Mistake That Kills Your Workflow Efficiency
- Optimizing Space: Using Convertible Furniture for Dual-Use Rooms
- Why Working from Your Bed Destroys Your Sleep Quality
- Optimizing Your Lights: Setting Scenes to Match Natural Circadian Rhythms
- How to Use Art Appreciation to Improve Problem-Solving Skills?
Why Your Physical Environment Dictates Your Creative Output
The romantic image of the artist thriving in a chaotic garret is a compelling but misleading myth. From a design and neuroscience perspective, your physical surroundings are not a passive backdrop; they are an active co-creator in your work. The layout, light, and organization of your space send constant signals to your brain, either fostering focus and innovation or creating friction and distraction. This concept, known as environmental psychology, is fundamental to designing a successful micro-studio. Your space should be an intentional system of rewards and positive cues, not a source of underlying threat or stress.
Consider the impact of natural light. Beyond simple illumination, it is a biological necessity that governs our energy and mood. Studies consistently show that access to daylight is a powerful productivity driver. For example, some research indicates that workplaces with access to natural light see employees reporting an 18% increase in productivity. This isn’t just about seeing better; it’s about your body’s internal clock being correctly calibrated, leading to greater alertness and cognitive function. A desk pushed into a dark corner is actively working against your biology.
This principle extends to every element. The presence of plants (biophilic design), organized tools, and a clear workspace aren’t just aesthetic choices. They reduce cognitive load, allowing your brain to dedicate its full resources to creative problem-solving. As neuroscience research has shown, our brains are wired to perform better in environments that feel supportive. According to a review by the University of Western Ontario, “Neuroscience research shows that employees work more efficiently, are more motivated, and achieve higher levels of performance when the work environment includes rewards and does not pose threats.” Your small studio, therefore, must be designed as your brain’s greatest ally.
How to Soundproof a Room Cheaply for Recording Audio?
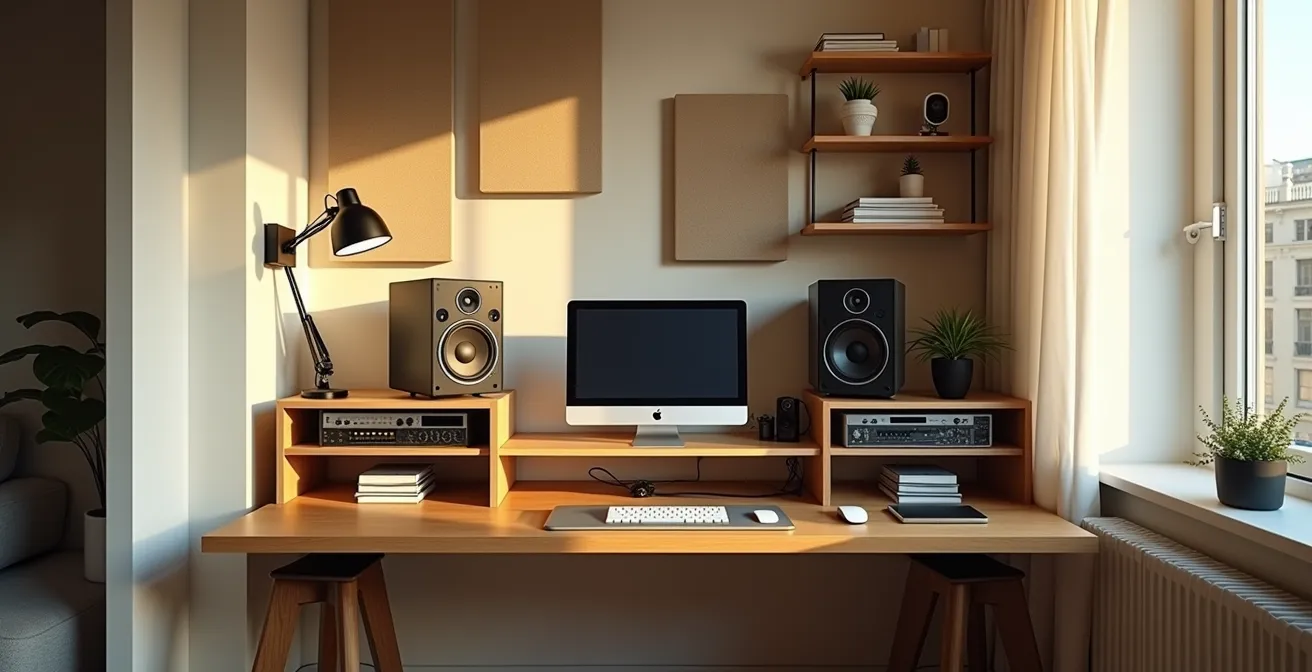
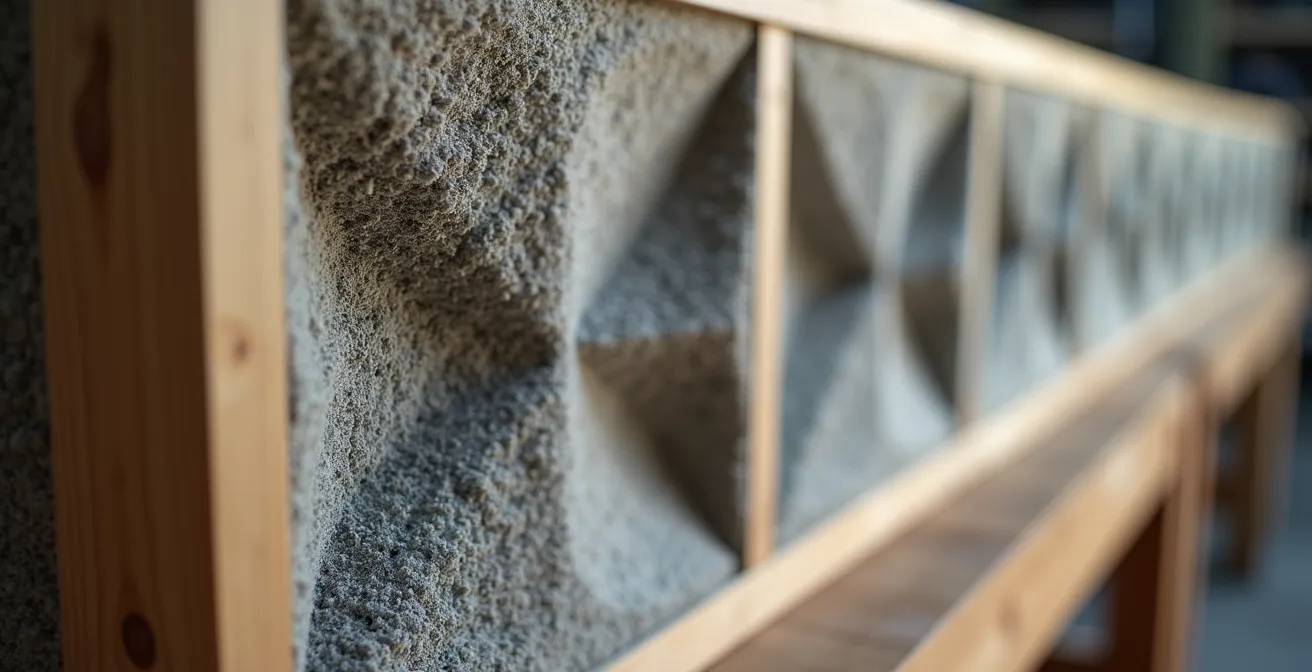
For anyone recording audio in an apartment, sound is the most immediate and invasive challenge. The hum of a refrigerator, distant traffic, or a neighbor’s television can ruin a perfect take. While true soundproofing involves construction, what most creators actually need is acoustic treatment: controlling the sound *within* the room to reduce echo and reverberation. Commercial solutions are expensive, but a DIY approach, grounded in basic physics, can yield professional-level results on a shoestring budget.
The key is absorption. Hard, flat surfaces like drywall and windows reflect sound waves, creating a messy, echoing soundscape. The solution is to introduce soft, dense materials that trap this energy. Forget thin acoustic foam, which only absorbs high frequencies and does little to control the muddiness in the mid and low ranges. Your best investment is building your own broadband acoustic panels. These are simple wooden frames filled with high-density insulation like rigid fiberglass or mineral wool (Roxul Safe’n’Sound) and wrapped in a breathable fabric. Placed strategically at “first reflection points”—the spots on your walls and ceiling where sound from your speakers or voice would bounce directly to your ears—they can dramatically clean up your room’s sound.
This image illustrates the professional yet achievable look of well-made DIY panels. Their texture and placement are key to their function.
When choosing materials, density and the Noise Reduction Coefficient (NRC) rating are what matter. A higher NRC means more sound is absorbed rather than reflected. An analysis of DIY materials shows a clear winner for home studios balancing cost and performance.
| Material | Density | NRC Rating | Cost per Panel | Best Use |
|---|---|---|---|---|
| Owens Corning 703 | 3 lb/ft³ | 0.86-1.14 | $30-40 | Professional studios |
| Roxul Safe’n’Sound | 2.5 lb/ft³ | 0.95-1.05 | $20-25 | Home studios |
| Moving Blankets | Variable | 0.30-0.50 | $15-20 | Temporary solution |
| Acoustic Foam | 1.5 lb/ft³ | 0.40-0.80 | $25-35 | High frequency only |
As the data on soundproofing materials suggests, mineral wool like Roxul offers near-professional absorption at a fraction of the cost, making it the ideal core for your DIY panels. By focusing on absorption rather than isolation, you can achieve a controlled, professional-sounding recording environment without structural changes.
Warm or Cool Light: Which Color Temperature Boosts Creativity?
Light is more than just visibility; it’s a powerful psychological signal that can alter your mood, energy, and even your style of thinking. The debate between warm (yellowish) and cool (bluish) light isn’t merely aesthetic. Choosing the right color temperature—measured in Kelvin (K)—is about matching your biological state to your creative task. There is no single “best” light for creativity; the optimal choice depends on the type of creative work you are doing.
Cool-toned light, typically above 4000K, mimics the bright light of midday. This type of light is rich in blue wavelengths, which our brains associate with peak alertness. It has been shown to suppress melatonin, the hormone that makes us feel sleepy, and enhance concentration and analytical performance. This makes cool light ideal for tasks that require intense focus, detail-orientation, or problem-solving. If your creative process involves editing video, mixing audio, coding, or any task where precision is paramount, a cool, bright environment will be your greatest asset.
Conversely, warm-toned light (below 3000K) resembles the gentle glow of sunrise or sunset. This light has fewer blue wavelengths and a more reddish hue, which has a calming and relaxing effect on our nervous system. This state of relaxed alertness is highly conducive to brainstorming, free association, and divergent thinking—the cornerstones of initial ideation. If you are sketching, writing initial drafts, or developing broad concepts, a warm, cozy lighting environment can lower inhibitions and encourage a more fluid and expansive creative flow. Research from a Building Research Establishment (BRE) study highlights the profound effect of proper lighting, finding that optimized light can enhance productivity by up to 25% and improve mood. The ultimate strategy is not to choose one over the other, but to have a dynamic lighting system that you can adapt to your specific task.
The Storage Mistake That Kills Your Workflow Efficiency
In a small studio, the most common storage mistake isn’t a lack of shelves; it’s a lack of system. Piling gear into bins or onto shelves without a clear organizing principle creates constant friction. Every time you have to hunt for a cable, dig out a microphone, or untangle headphones, your creative momentum is broken. This isn’t just an inconvenience; it’s a tax on your cognitive resources. A well-designed studio eliminates this tax by implementing a system of workflow ergonomics, where storage is dictated by frequency of use.
The solution is to think like a chef in a professionally designed kitchen, where every tool is placed according to a “mise en place” philosophy. This translates to a zone-based storage system. Your space should be divided into concentric circles of accessibility radiating out from your primary working position. This creates a spatial hierarchy that mirrors your creative process, making your workflow seamless and intuitive. Your most-used tools should require zero thought to access, while less frequent items are stored neatly out of the way, yet still accessible.
Adopting this mindset transforms storage from a passive container into an active part of your workflow. By auditing your tools and habits, you can build a system that anticipates your needs, keeping you in a state of flow instead of constantly pulling you out of it. It’s about making the path of least resistance align perfectly with your most efficient creative process. The physical satisfaction of an organized space directly translates to higher motivation and productivity.
Your Action Plan: Auditing Your Workflow Ergonomics
- Points of Contact: Identify your ‘Always-On’ zone. List all the tools that never move and must be at your primary point of contact (e.g., monitor, keyboard, audio interface). Are they positioned for optimal ergonomics?
- Collect: Inventory your ‘Arm’s Reach’ zone. Gather every item you use daily (e.g., primary microphone, headphones, notebook). These must be accessible with a simple reach, without standing or searching.
- Coherence: Confront your ‘Step Away’ zone. Review items used weekly or for specific projects (e.g., secondary lenses, different controllers). Ensure they are logically grouped on nearby shelves or drawers, consistent with your workflow stages.
- Mémorabilité: Audit your ‘Deep Storage’. For rarely-used gear and cables, is the system memorable? Implement clear labels on containers to eliminate guesswork and make retrieval instant.
- Plan d’intégration: Create a cable management plan. Use under-desk trays, velcro ties, and cable sleeves to integrate your zones seamlessly, ensuring no cable pull or tangle can disrupt your flow.
Optimizing Space: Using Convertible Furniture for Dual-Use Rooms
In a small apartment, the biggest luxury isn’t space, but the separation of activities. When your living room is also your office, and your bedroom is also your studio, the lack of physical boundaries can lead to a lack of mental boundaries. This is where convertible and multifunctional furniture becomes more than a space-saving gimmick; it becomes a critical tool for psychological partitioning. The act of transforming a piece of furniture—folding down a desk, rolling out a workstation—creates a ritual that signals a shift in purpose to your brain.
This transition is the modern-day equivalent of closing the studio door. It carves out a dedicated creative zone that can appear when needed and vanish when it’s time to relax, preserving the restful nature of your living area. Look for wall-mounted folding desks, mobile storage units on casters that can be rolled under a console table, or even coffee tables that lift to become ergonomic workstations. The goal is to create spaces that “work hard so that life is a little easier,” as one architect aptly put it.
This image captures the grace of such a transformation—the space is changing its function in a deliberate, satisfying motion.
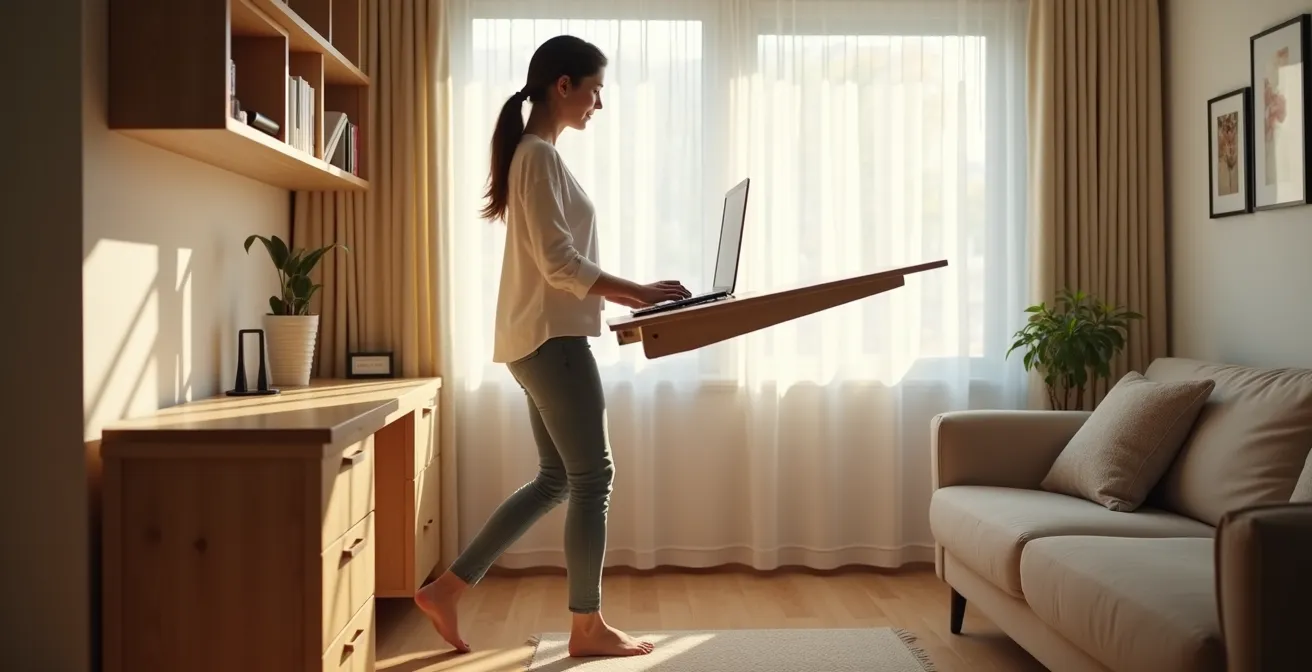
This isn’t just theory; it’s a proven strategy in micro-apartment design. By making your furniture do double or triple duty, you allow a single room to host multiple “virtual” rooms, each with its own distinct purpose and psychological feel. The key is that the transition should be effortless, taking no more than a minute to complete. If it’s a hassle, you won’t do it, and the boundaries will blur once again.
Case Study: The 27sqm Sydney Studio Transformation
Architect Eleanor Peres brilliantly redesigned her 290sqft Sydney studio to serve multiple functions without feeling cluttered. Her design philosophy was to create “spaces that work hard so that life is a little easier.” Key to this was custom joinery, including kitchen units with counter extensions that could serve as a prep area, a dining bar, or a standing desk. A mirrored wall visually doubled the space, while built-in shelving created subtle transitions between the kitchen, living, and work zones. This approach allowed for seamless shifts between cooking, hosting, relaxing, exercising, and working, proving that intelligent, multifunctional design is the ultimate solution for small-space living.
Why Working from Your Bed Destroys Your Sleep Quality
The bed is often the first place we turn to work in a small apartment. It’s comfortable, it’s there, and it requires no setup. However, from an environmental psychology standpoint, this is one of the most destructive habits for both your creativity and your well-being. Your brain is a powerful association machine. For years, it has been trained to associate your bed with rest, vulnerability, and sleep. When you introduce work—with its deadlines, stresses, and cognitive demands—into that environment, you create a state of associative confusion.
This confusion works both ways. When you try to work in bed, your brain’s deep-seated association with relaxation can make it difficult to achieve the sharp focus needed for creative tasks. You’ll feel lethargic and easily distracted. More damagingly, when you try to sleep at night, your brain now links the bed with the alertness and anxiety of your work. You’re teaching your mind that the bed is a place of performance and pressure, which can lead directly to insomnia and poor sleep quality. You are effectively erasing the one true sanctuary your apartment has.
Creating a dedicated workspace, even if it’s a small folding desk that you put away each night, is an act of psychological hygiene. It preserves the bed as a space for rest and recovery only. This separation is non-negotiable for long-term mental health and creative sustainability. As research has repeatedly shown, a brain under stress cannot function at its peak.
A stressed out brain cannot think creatively, work collaboratively, or solve problems effectively.
– Choate, 2018, Neuroscience Research on Workplace Environment
By violating this fundamental spatial boundary, you are placing your brain in a constant state of low-grade stress, sabotaging both your ability to work effectively and your ability to rest deeply. The two activities become contaminated by each other, and both suffer as a result.
Optimizing Your Lights: Setting Scenes to Match Natural Circadian Rhythms
Beyond the simple warm-cool dichotomy, the most advanced approach to studio lighting is to create a dynamic system that mimics the natural 24-hour cycle of the sun. This is known as circadian-aligned lighting. Our bodies are finely tuned to the changing color and intensity of daylight, a rhythm that governs our sleep, energy, and hormone production. By programming your studio’s smart lights to follow this natural pattern, you can create powerful sensory cues that guide your brain through states of peak focus and deep relaxation.
In the morning, your lighting scene should be bright and cool (around 5000K), simulating the morning sun. This strong dose of blue-rich light acts like a shot of espresso for your brain, promoting alertness and preparing you for focused work. As the day progresses towards midday, the light can remain bright but shift to a more neutral white (4000K) to sustain energy. This alignment with our natural biology has a measurable impact; studies have shown that employees with access to natural light patterns experience a 56% decrease in drowsiness.
The real magic happens in the afternoon and evening. As the outside world winds down, so should your lights. Gradually shifting to warmer tones (3500K) and lower intensity in the late afternoon helps ease your brain out of high-focus mode. By evening, your studio should be bathed in a very warm, dim amber glow (2200K-2700K). This drastic reduction in blue light signals to your brain that the day is over, allowing melatonin production to begin and preparing you for a restful night’s sleep. This isn’t just about creating a mood; it’s a functional tool that helps you transition from “work mode” to “rest mode,” a crucial ritual in a dual-use space.
With modern smart bulbs and simple apps, creating these automated scenes is easier than ever. You can program a full day’s lighting schedule that runs in the background, providing the right biological cues at the right time without you ever having to think about it. This turns your lighting from a simple utility into an automated wellness and productivity system.
Key Takeaways
- Your Studio is a Tool: Shift your mindset from “finding space” to “designing a psychological environment” that actively supports creativity.
- Control Your Senses: Use DIY acoustic panels to manage sound and dynamic lighting (warm/cool) to match your creative task.
- Design Your Workflow: Implement a zone-based storage system where tool placement is determined by frequency of use to maintain creative flow.
- Create Boundaries: Employ convertible furniture to create “psychological partitions,” separating your work life from your personal life in the same room.
–
–
How to Use Art Appreciation to Improve Problem-Solving Skills?
The final layer of designing your creative sanctuary is personalization. This goes beyond simply decorating; it’s about infusing the space with objects, colors, and art that have personal meaning and serve a cognitive function. While the title suggests a passive “appreciation,” an architect’s approach is active: we use art and color as deliberate tools to shape the psychological experience of a space. How you personalize your studio can directly influence your mood, energy, and even your ability to solve complex problems.
Color psychology is a powerful and often-underestimated tool. Colors are not just aesthetic flair; they have measurable effects on our cognitive performance. For instance, environments with blue hues can induce calmness and enhance concentration, making them suitable for analytical or detail-oriented tasks. Greens, reminiscent of nature, are restorative and can help reduce mental fatigue during long sessions. Vibrant colors like orange or yellow can stimulate energy and optimism, making them excellent accents to spark initial brainstorming. The key is to use color with intention—perhaps a single green wall to rest your eyes on, or a vibrant piece of art that you look at to get a jolt of energy.
This principle of intentional personalization is being adopted by some of the world’s most innovative companies. They recognize that giving employees a sense of ownership over their space fosters a deeper connection and boosts engagement. By surrounding yourself with art and objects that inspire you—a favorite print, a sculpture, photos from a trip, even a beautifully designed tool—you are building a nest of positive psychological cues. This sense of ownership and personal expression creates a more rewarding environment, which in turn makes you more motivated and resilient in your creative work.
Case Study: Etsy’s Personalized Workspace Program
Etsy, a company built on creativity and individuality, encourages its employees to personalize their workstations with art and personal items. This program isn’t just for morale; it’s a strategic part of their corporate ethos. Post-implementation studies found the initiative led to a 19% increase in reported work satisfaction and a significant 25% increase in staff engagement. Etsy credits these impressive results to the powerful sense of connection and ownership that a customized workspace promotes, demonstrating that when a space reflects the individual, it enhances both creativity and productivity.
Ultimately, designing your studio is an act of self-reflection. Start today by looking at your space not for what it is, but for what it could be. Evaluate one element—your lighting, your storage—and make one intentional change. Your creative breakthrough might just be a design decision away.